Help
1. Gridex Protocol
The Gridex Protocol is a decentralized crypto trading protocol on the Ethereum blockchain, consisting of a set of persistent and non-upgradable smart contracts.
DeFi would not be where it is without AMM, but it is unable to meet the diverse needs of traders and market makers due to impermanent loss, high slippage, and lack of flexibility. The AMM model is most suitable for less volatile trading pairs, such as swaps between stablecoins.
With our novel Grid Maker Order Book (GMOB) model, we have significantly reduced the resource consumption of running an order book based system, allowing us to deploy and run it on the Ethereum mainnet while making the gas cost comparable to that of AMMs.
2. Swap
Swaps are the most common way of interacting with the Gridex protocol. For users, swapping is straightforward: a user selects an ERC-20 token that they own and a token they would like to trade it for. Executing a swap sells the currently owned tokens for the proportional amount of the tokens desired, minus the swap fee, which is awarded to the Makers.
2.1 How do I perform a swap?
On the platform interface, you can exchange tokens in two places: "Swap\" or \"Trade-Swap".
When using the \"Swap\" interface, hybrid routing is used.
Hybrid routing will search through Gridex, Uniswap (V2+V3), and also Curve to find the most optimal route for the cheapest price, then submit the transaction through the relevant DEX(s).
When using the "Trade-Swap\" interface, there are three routing methods to choose from:
All: Routed through Gridex, Uniswap (V2+V3) and Curve.
Native: Routed through the Gridex protocol.
Specific: Routed only through the specific grid of choice.
The actions to perform a "Swap" are as follows:
2.1.1 Trade-Swap
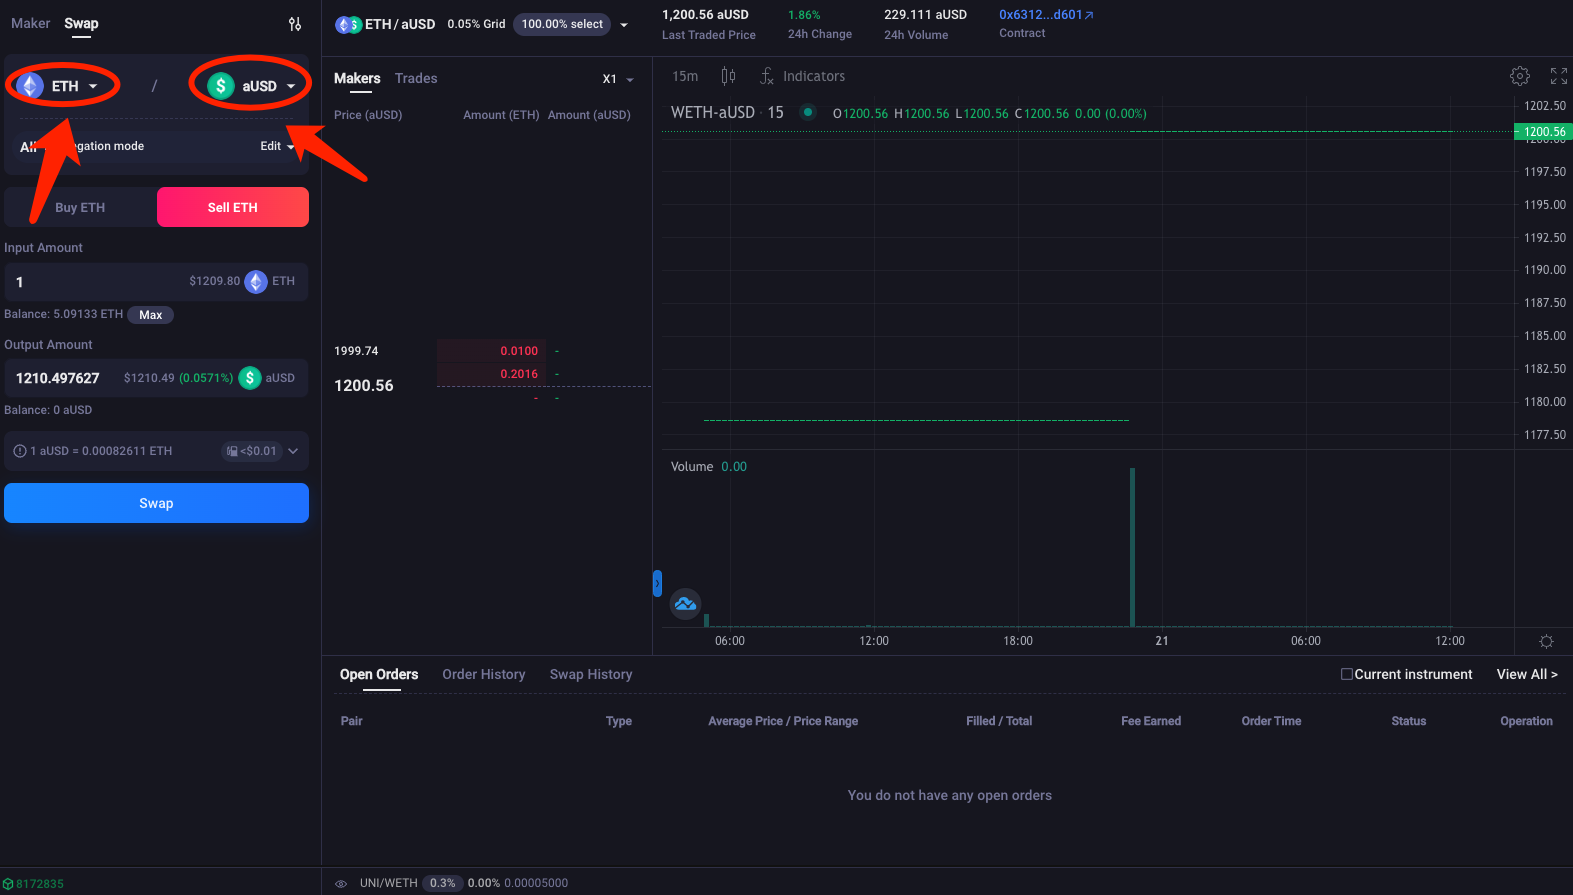
Select Tokens
Select the tokens you wish to swap.
Select an aggregation mode!
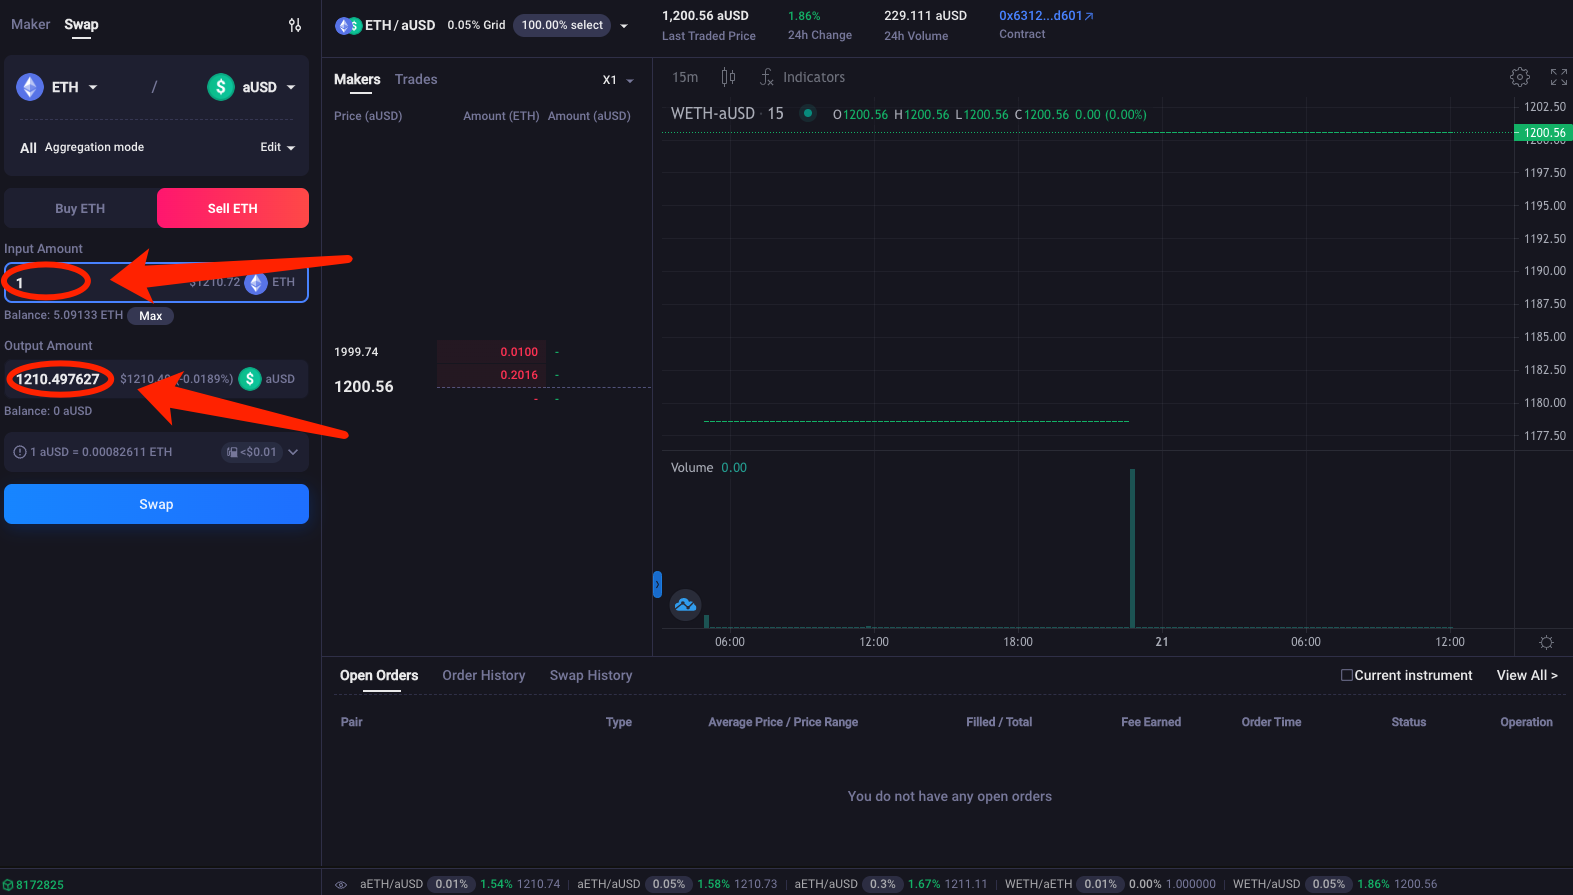
Enter the amount you would like to send or receive
Enter the amount that you wish to swap. You can enter either your desired input amount or desired output amount.
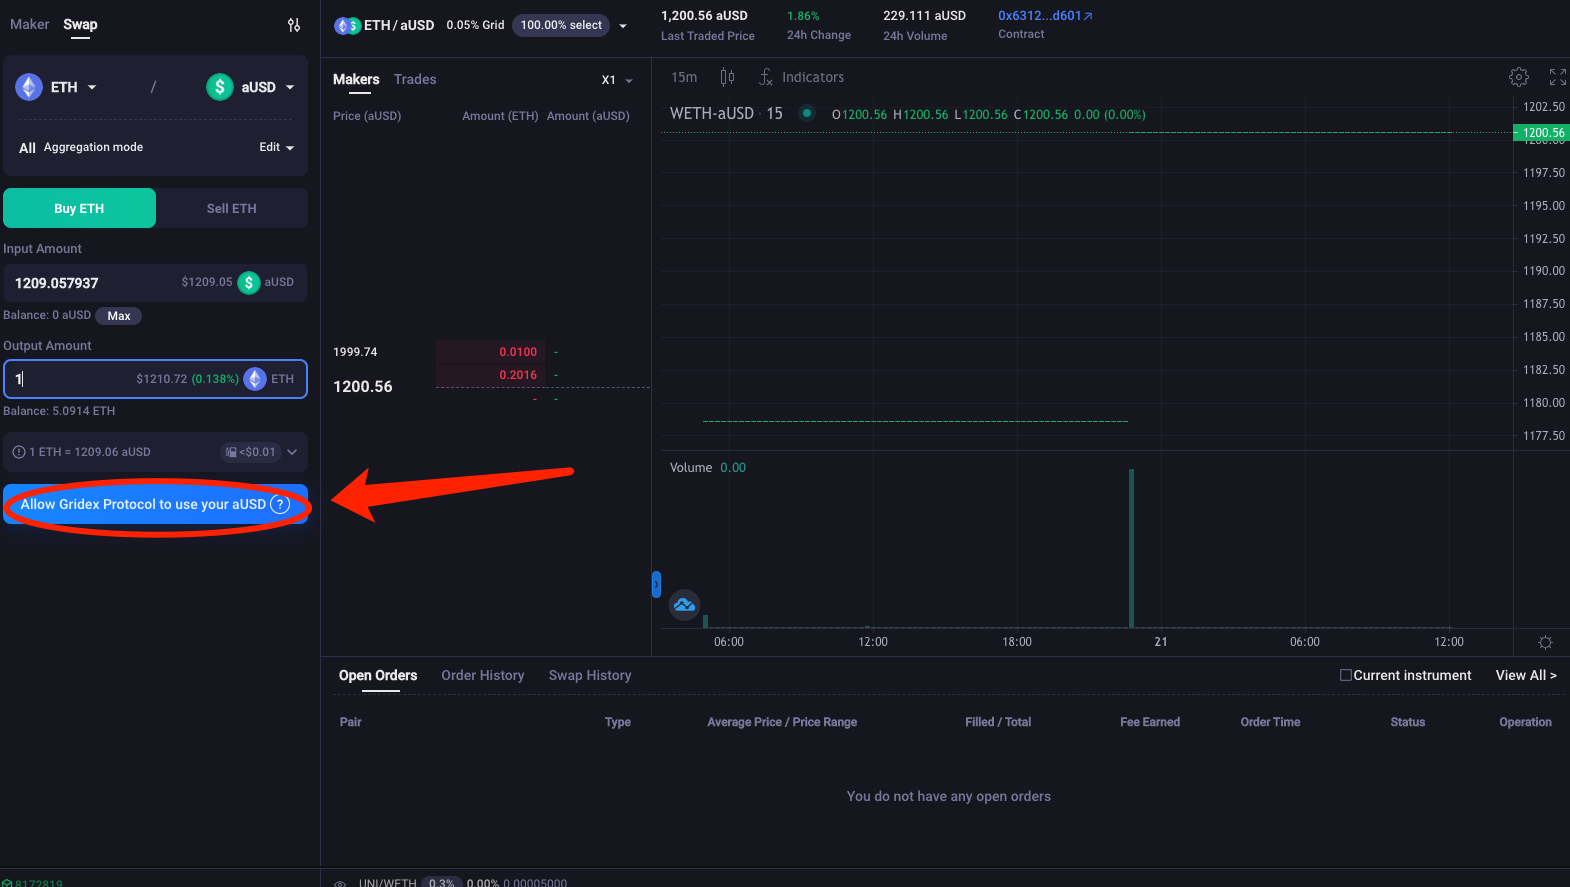
Approve the auto router to swap your token
If this is your wallet address is first time trading this token with the Gridex protocol, you will need to approve the token first.
Review and Confirm your swap
Click the Swap button to preview your swap.
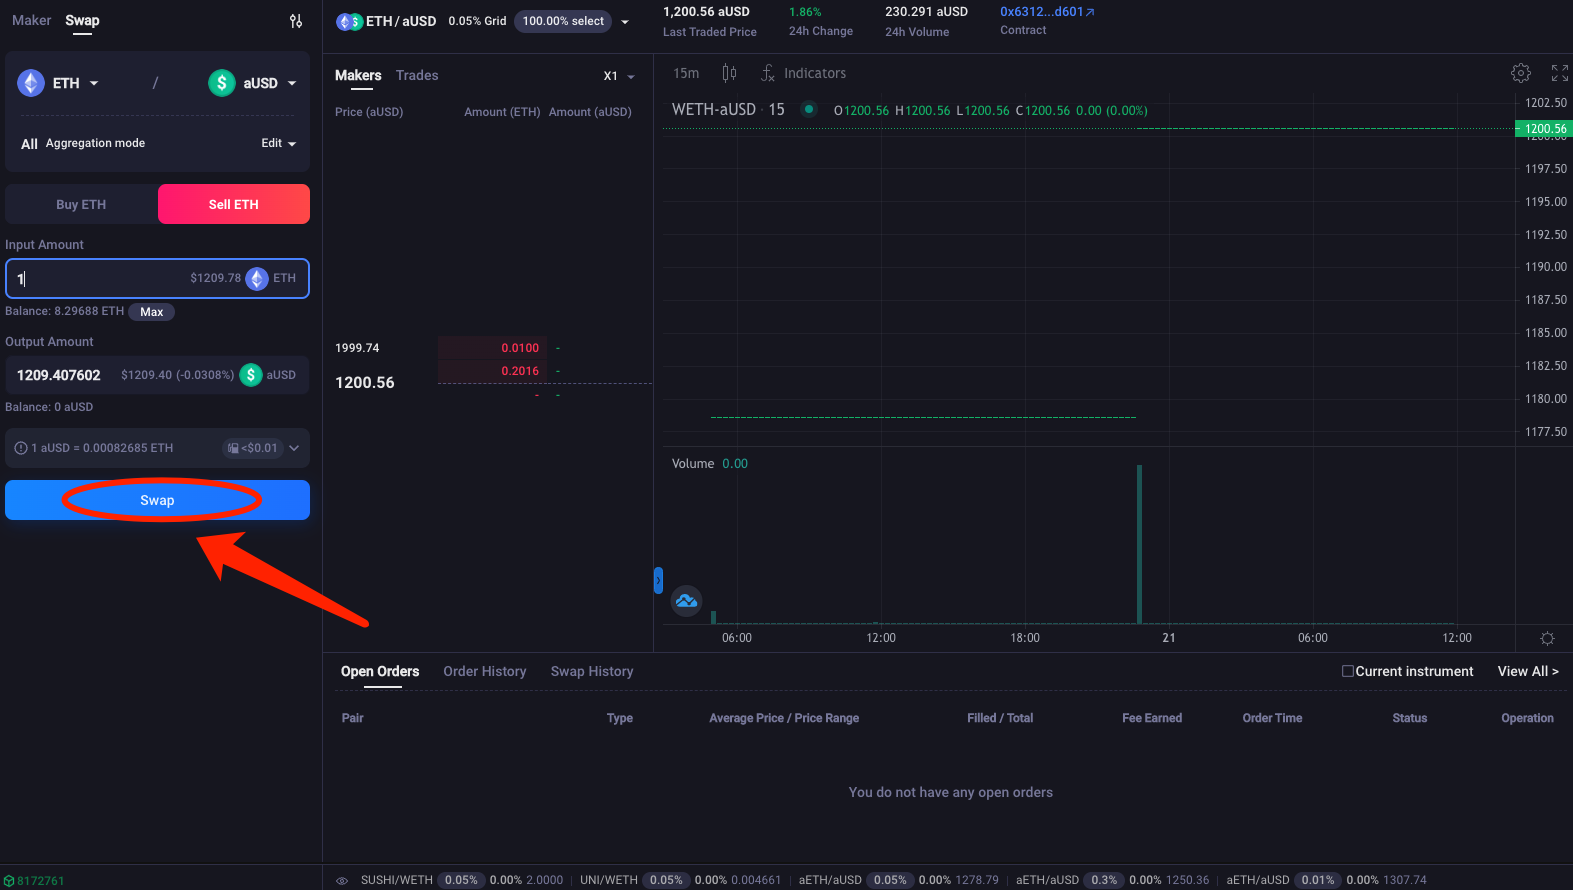
When you are ready, click the Confirm Swap button. Your wallet will ask you to confirm the action.
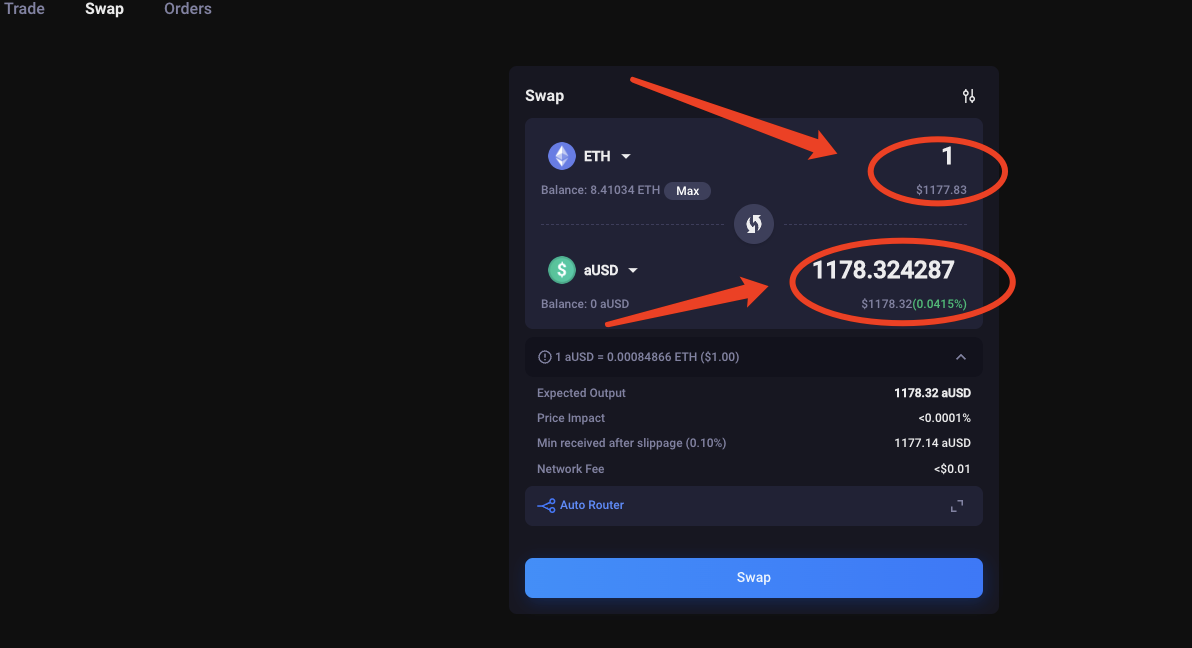
2.1.2 Swap
Select Tokens
Select the tokens you wish to swap.
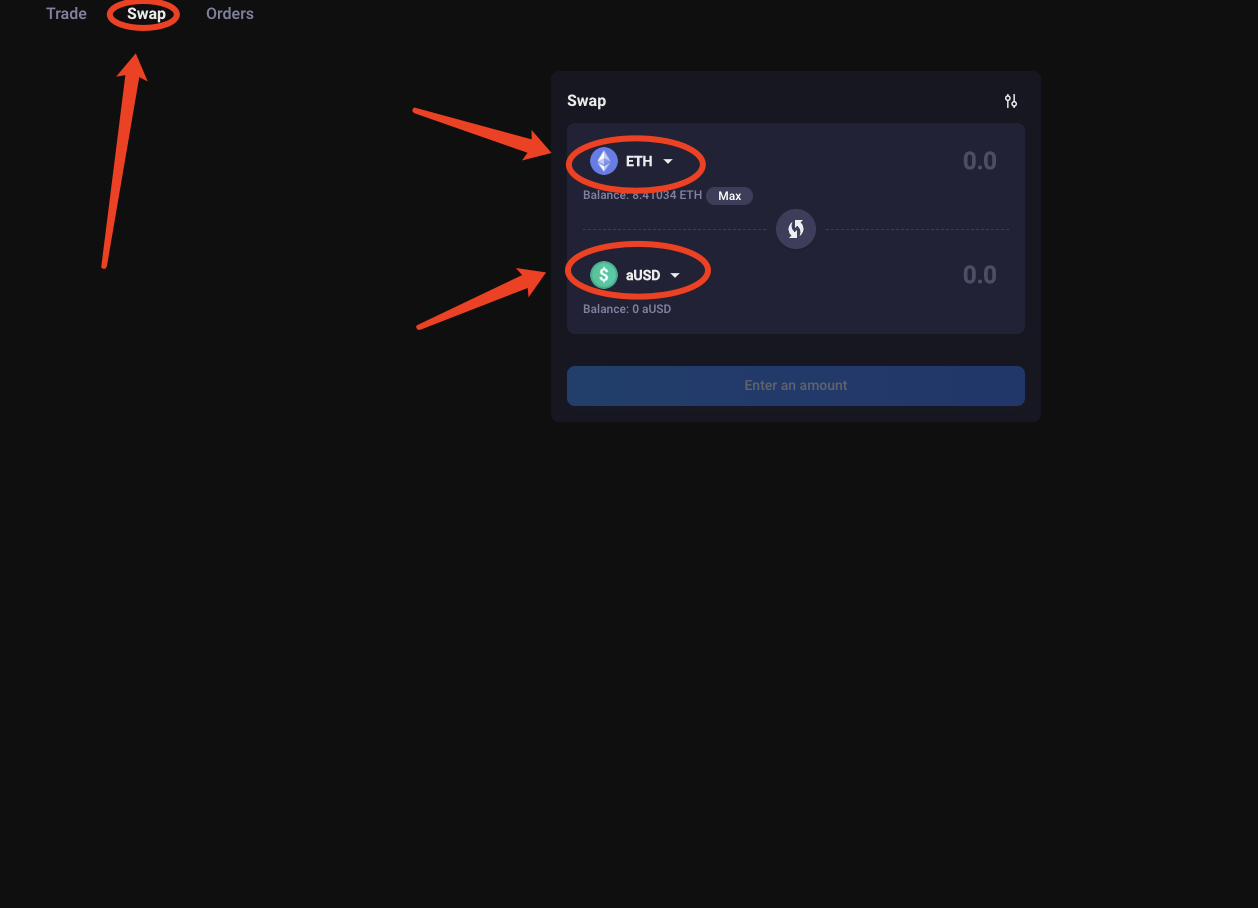
Enter amount you would like to send or receive
Enter the amount that you wish to swap. You can enter either your desired input amount or desired output amount.
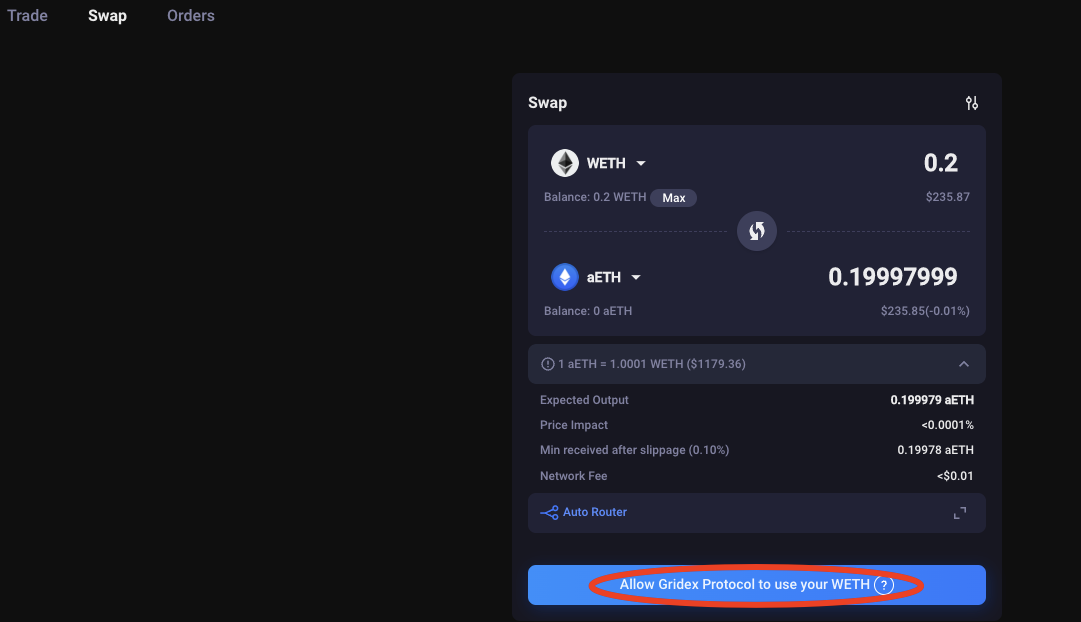
Approve the auto router to swap your token
If this is your wallet address' first time trading this token with the Gridex Protocol, you will need to approve the token first.
Review and Confirm your swap
Click the Swap button to preview your swap.
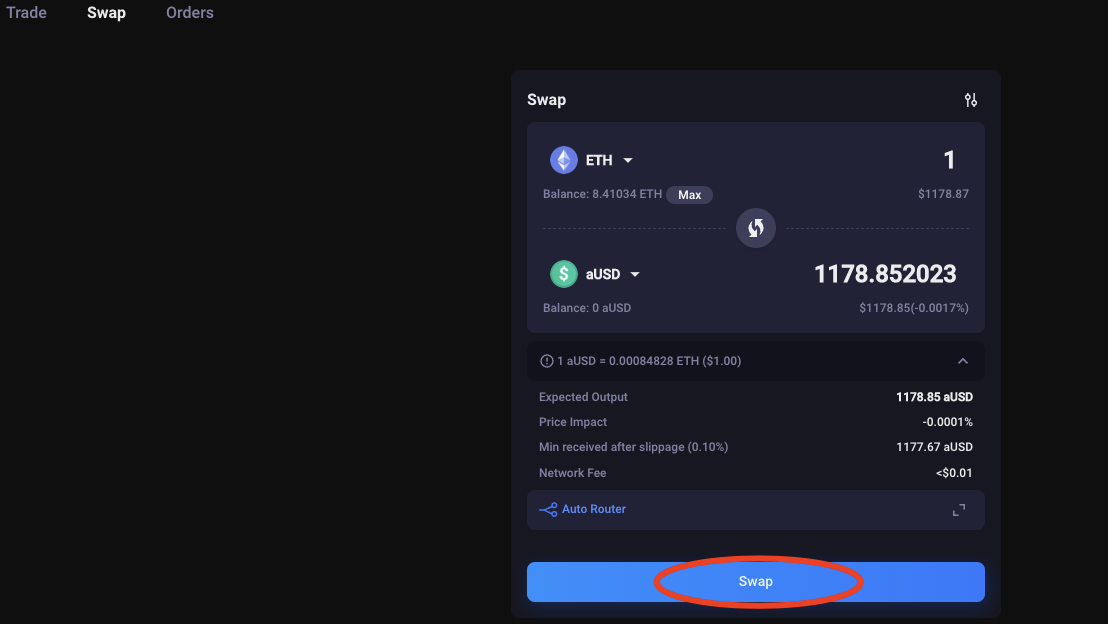
When you are ready, click the Confirm Swap button. Your wallet will ask you to confirm the action.

2.2 What is price impact?
Price impact is the change in token price directly caused by your trade. Price impact is reflected as the difference between the current market price and how your trade impacts the total liquidity in a pair.
The price impact you experience depends on the liquidity available for the pair.
When the pair has high liquidity, your trade may have a smaller price impact. When the pair has low liquidity, your trade may have a larger price impact.
Therefore, the larger the price impact, the worser the overall price you may receive.
It's important to remember that the price impact rate changes constantly, because the total liquidity of a pair changes based on the supply and demand of each token.
3. Maker
3.1 Normal Maker Mode
Select a trading pair
Select the desired trading pair which you wish to place an order on.
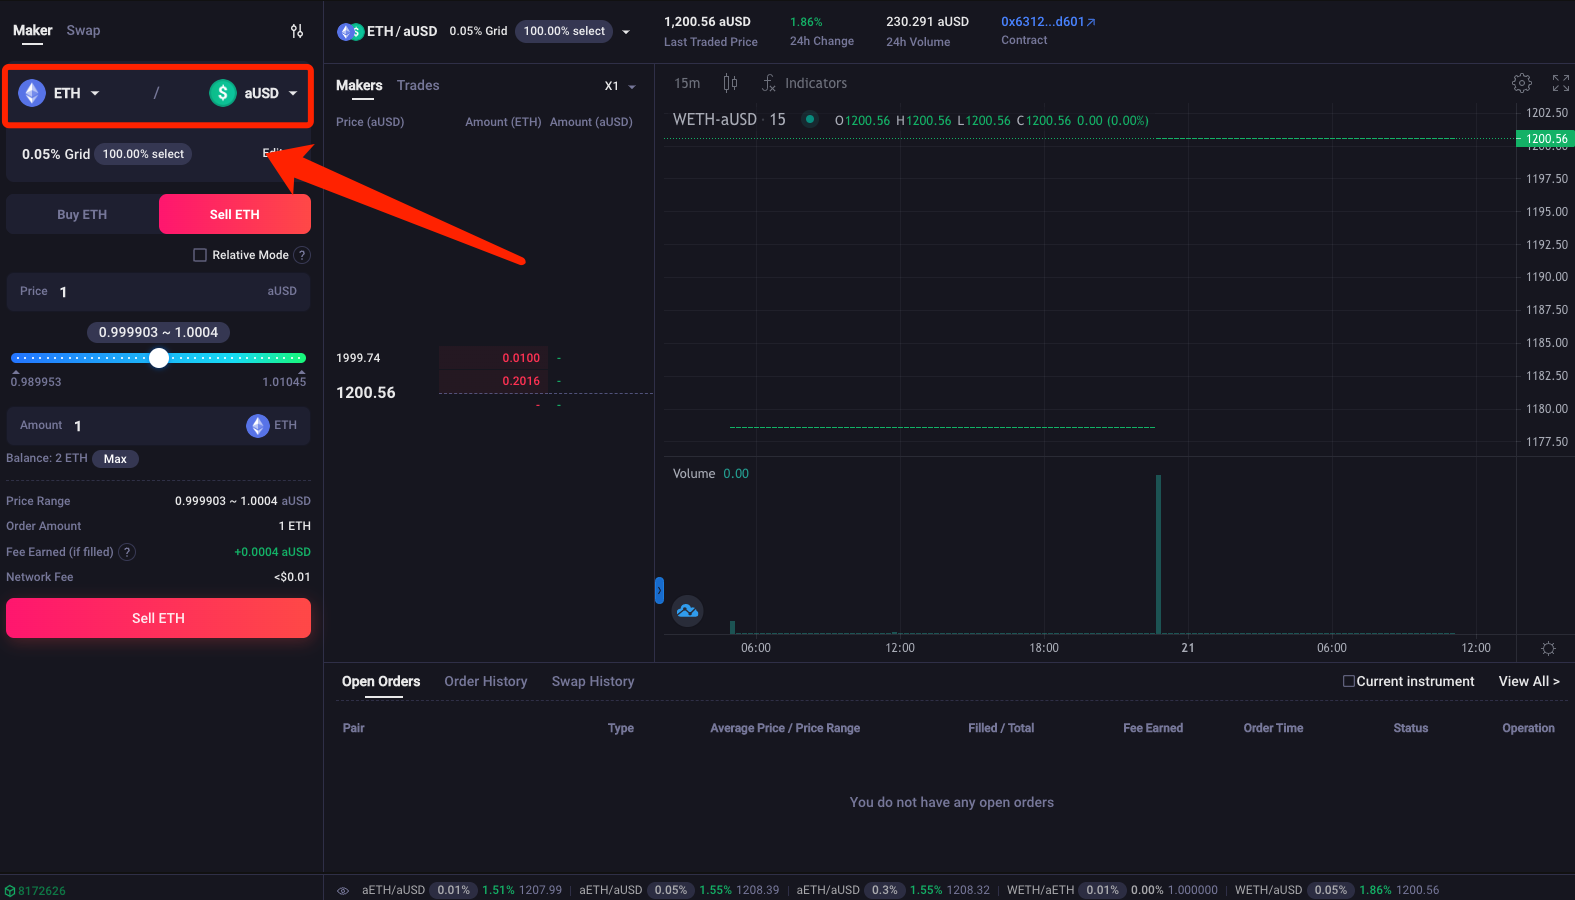
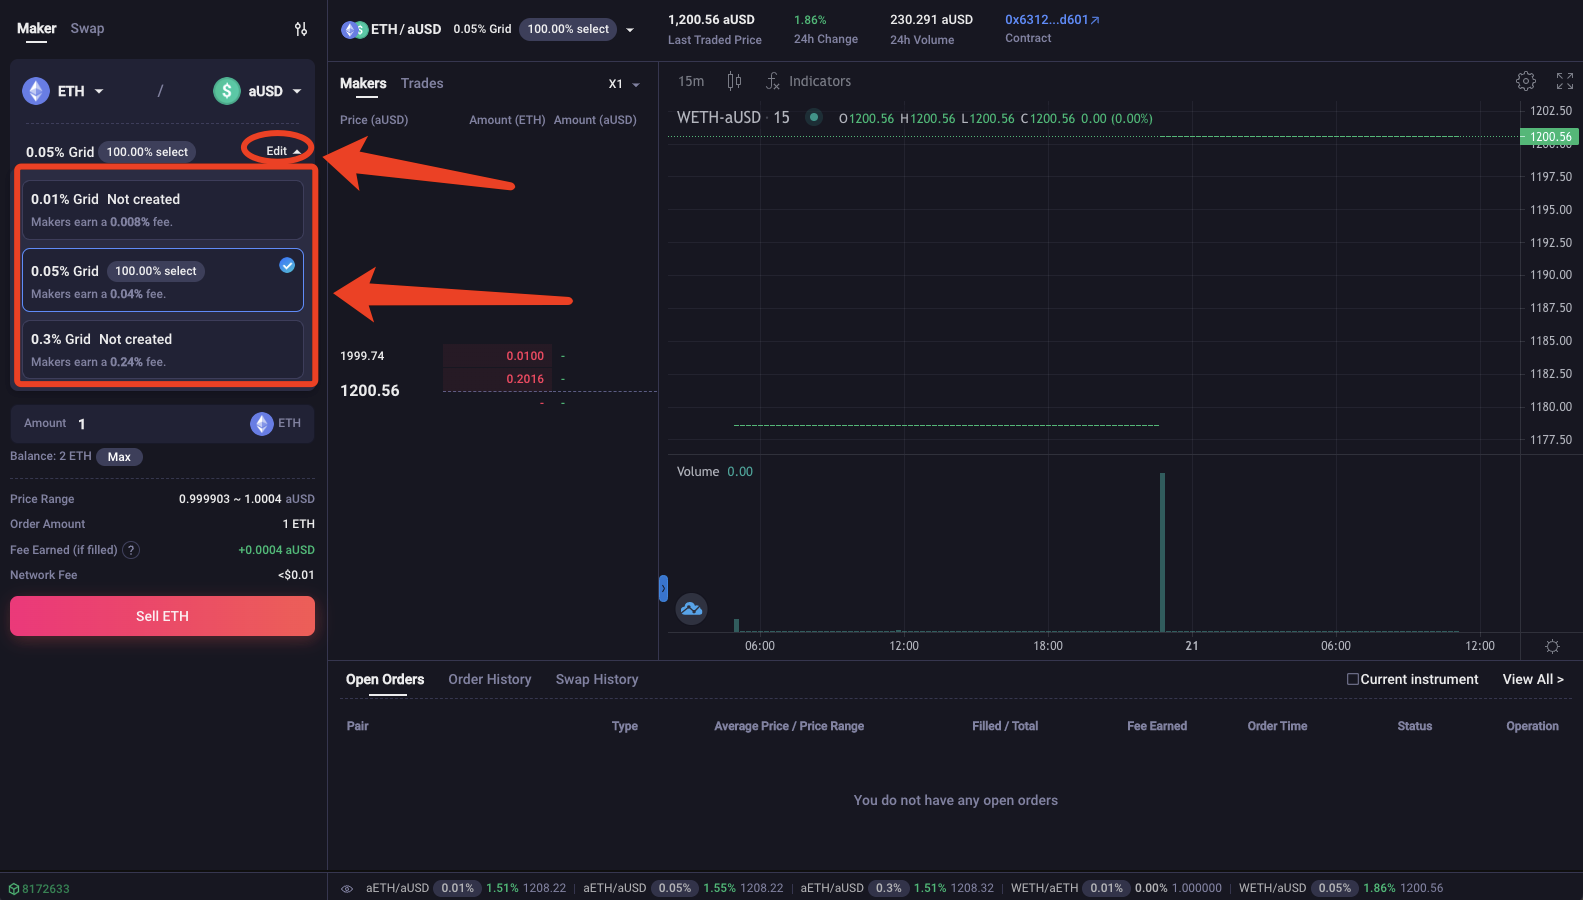
Select the fee level
Each trading pair offers three fee levels:0.01%、0.05%、0.3%.
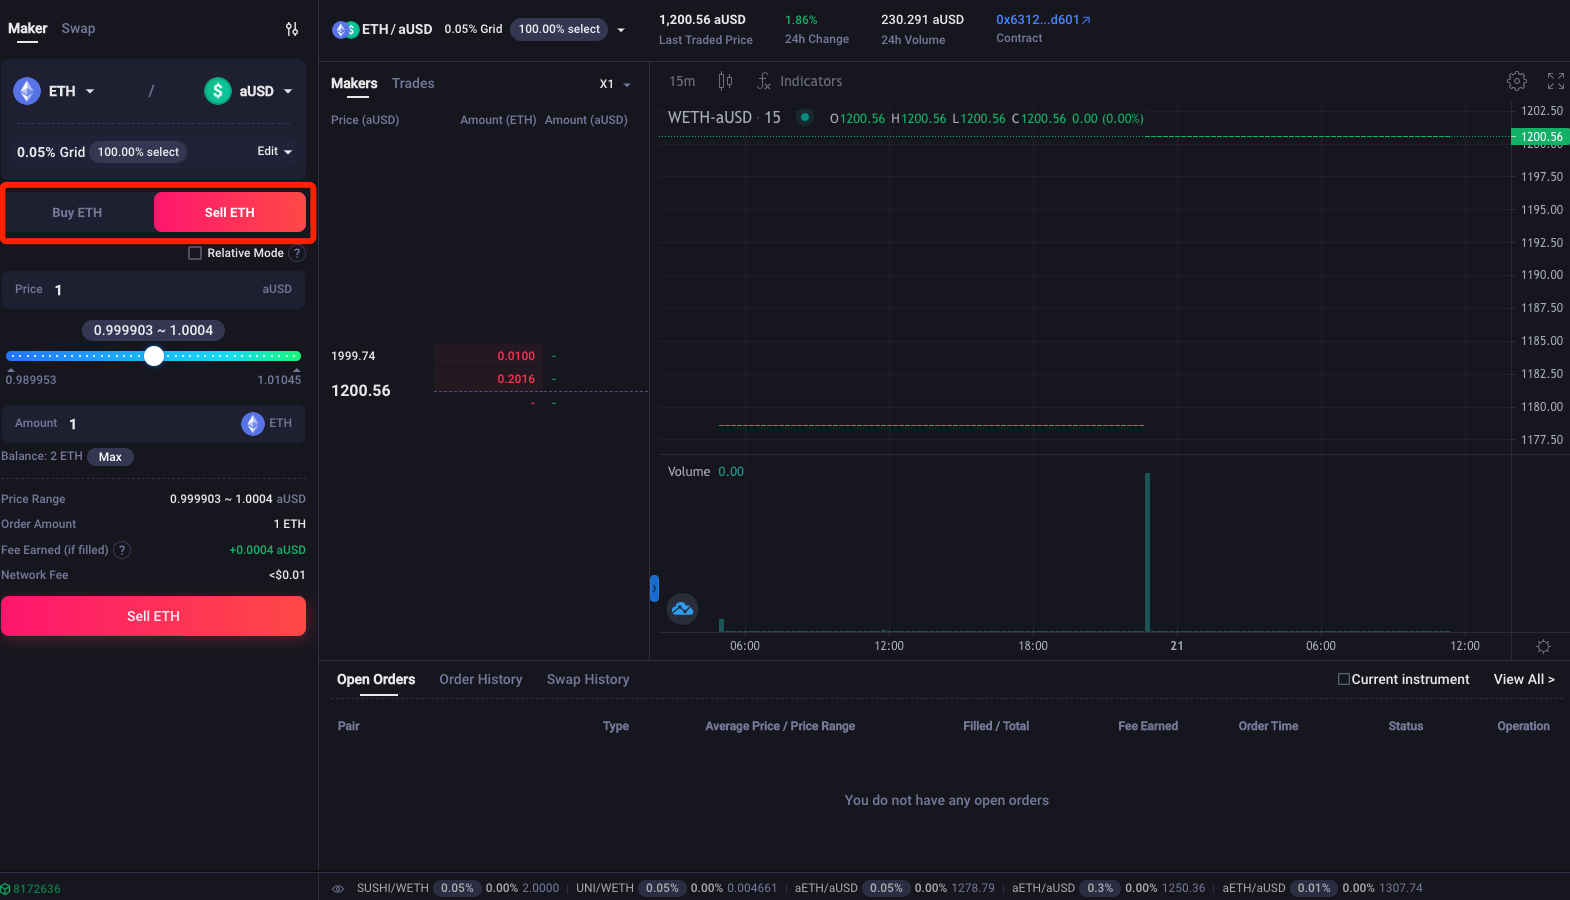
Choose the direction of the transaction
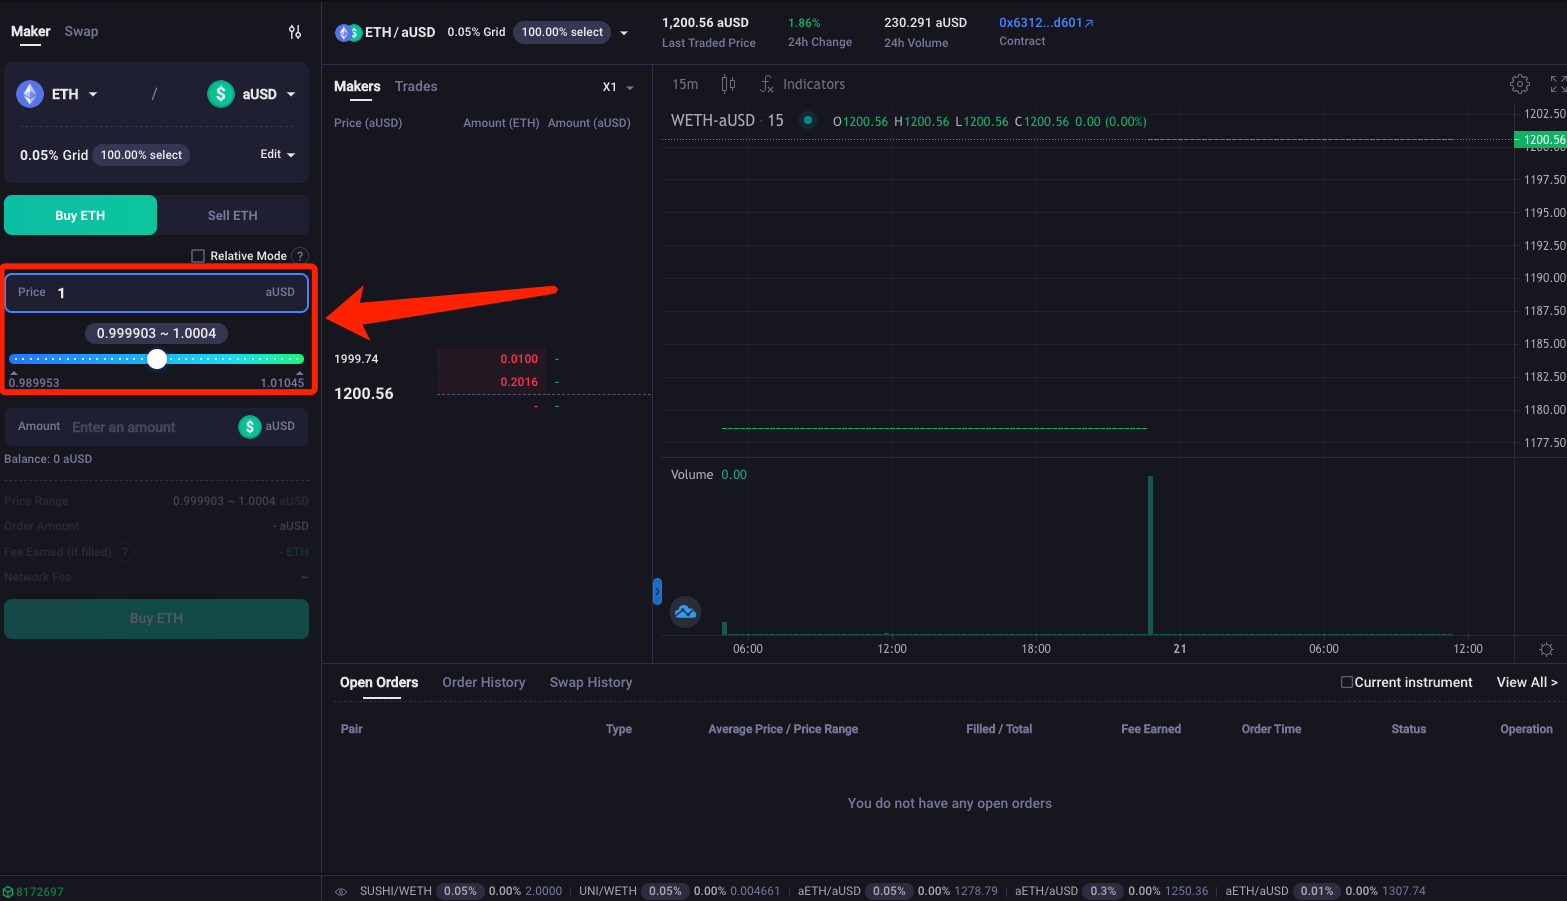
Enter the exchange price
After a desired exchange price has been entered, a narrow range will be generated containing your desired exchange price. Whereby, the order will be placed within that range. At the same time, you can also drag the slider to adjust the price range.
Enter the amount for the transaction
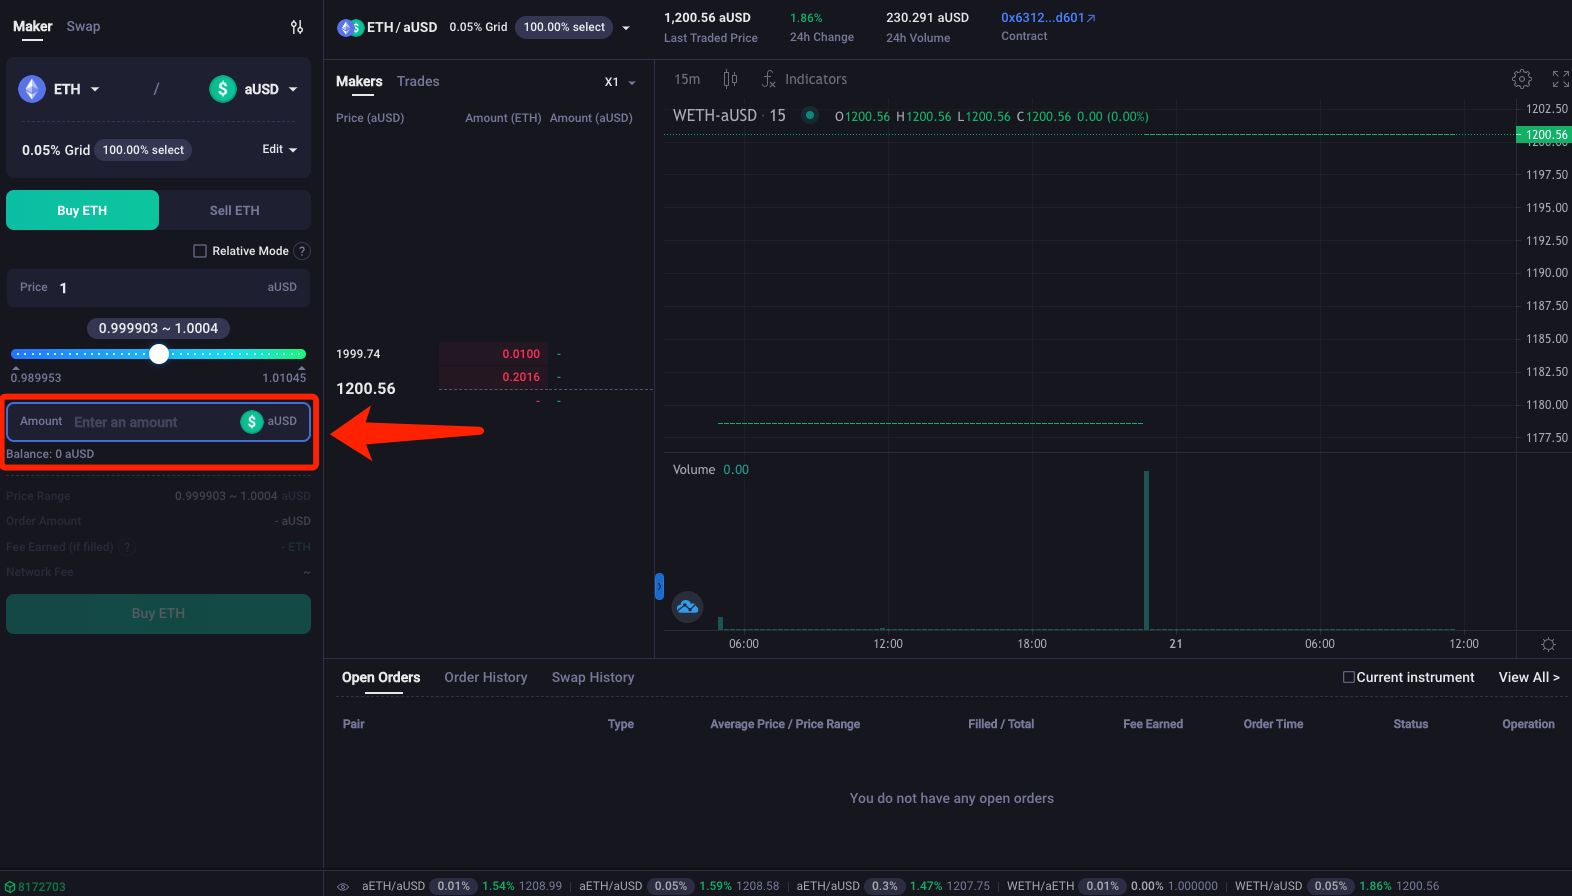
Transaction Approval
If this is your wallet address' first time placing a maker order with this token, you will need to approve it first.
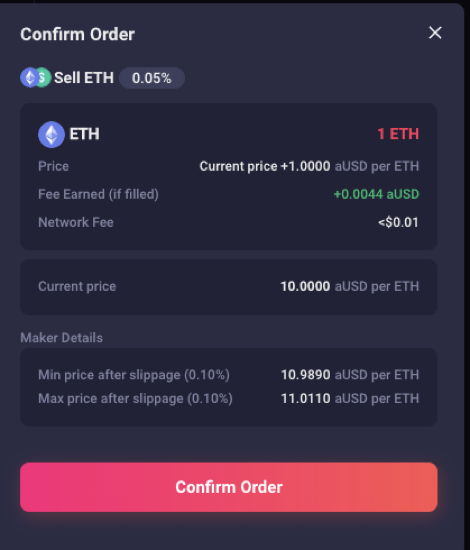
Confirm the order information and place an order
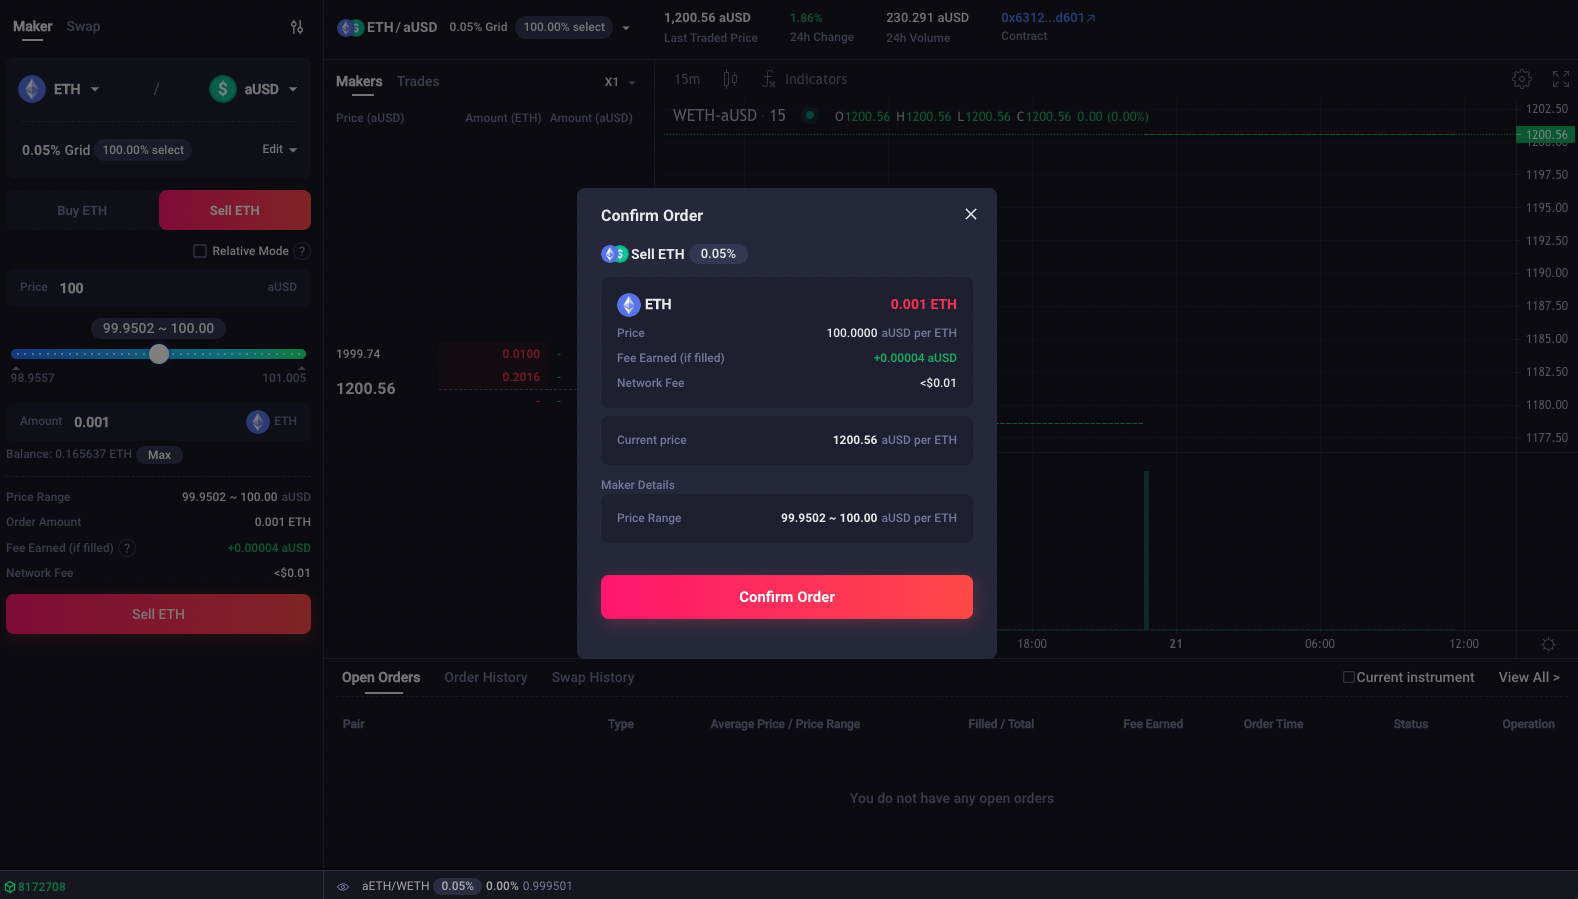
After an order has been placed successfully, you can check the status of the order in the Open Order tab
3.2 Relative Maker Mode
After selecting the trading pair, fee level and trading direction, follow the steps below:
Turn on Relative Maker Mode
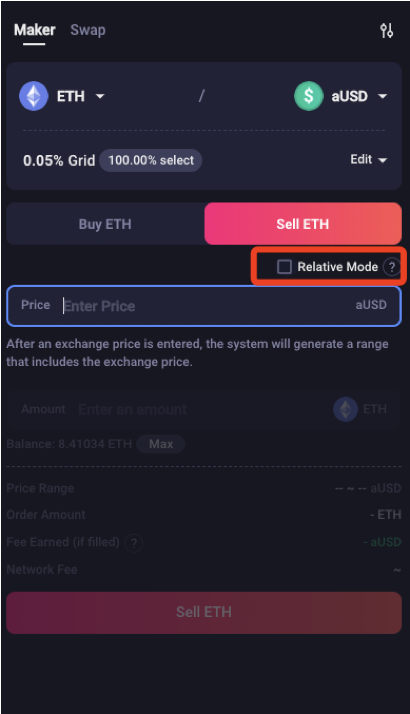
Enter the price difference
The number you enter here is the difference with the current price. After you enter the price difference, the system will calculate a relative price based on the input number (can be positive or negative), that is, relative price = current price ± price difference. The relative price will change with the current price.
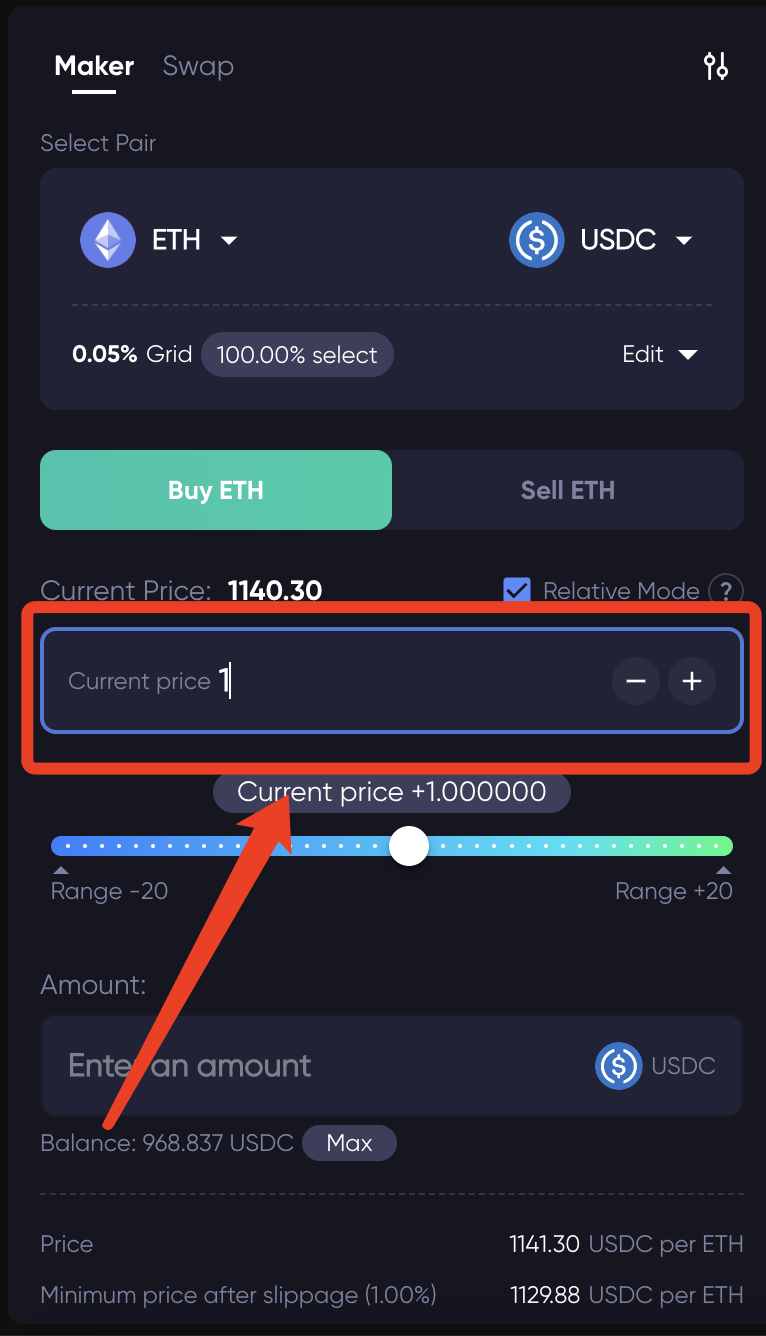
Enter the amount
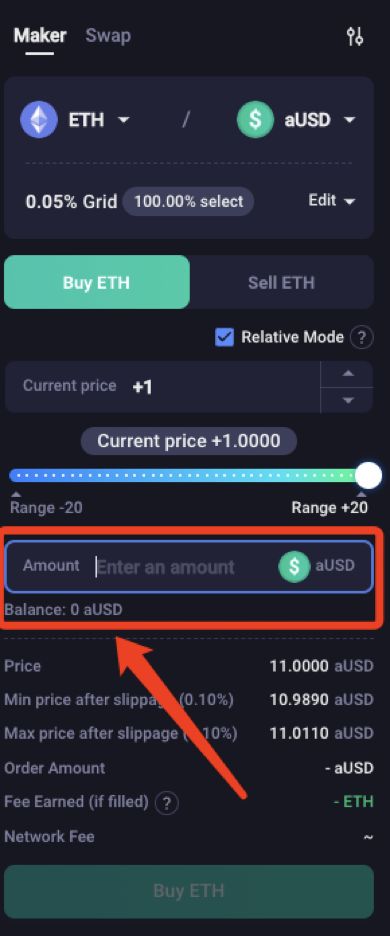
Transaction Approval
If this is your wallet addresses first time placing a maker order with this token, you will need to approve it first.
Confirm the order information and place the order
After an order has been placed successfully, you can check the status of the order in Open Order tab
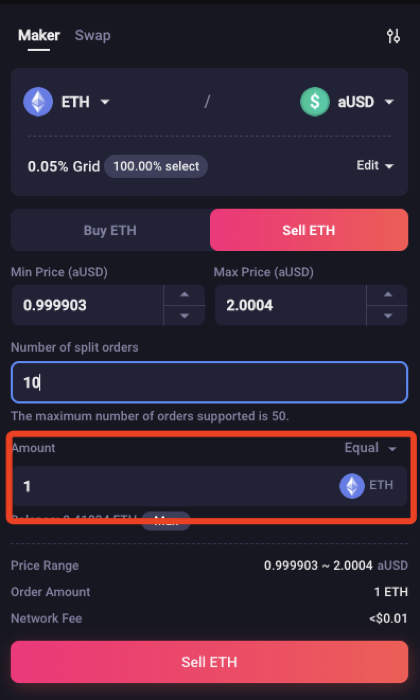
3.3 Advanced Maker Mode
In Advanced Maker Mode, once the maximum and minimum price of the range and the required number of orders are entered, the system will proceed to calculate the ranges of each order according to the method you choose (the default Equal mode can also be manually switched to the Arithmetic mode).
In Gridex, you can use the Advanced Maker Mode on the "Trade-Maker\" page. If you want to use the advanced mode, you need to open it first.

After selecting the trading pair, fee level and trading direction, follow the steps below:
Set the price range
After you enter min price or max price, the system will automatically adjust for the most suitable interval boundary value.
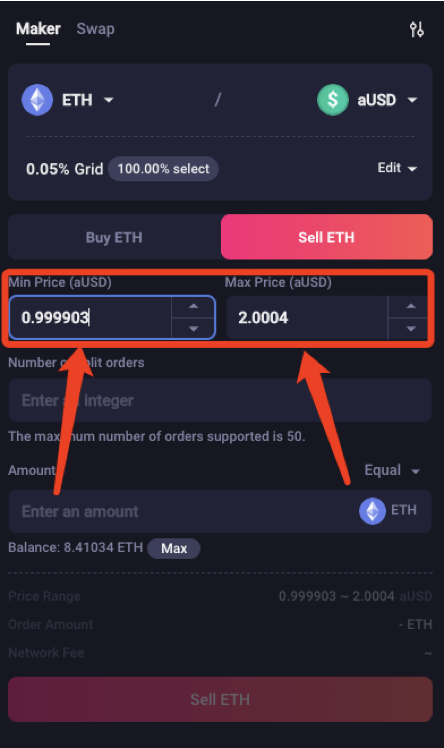
Enter the number of split orders
After the price range is determined, the system will calculate the maximum number of orders based on the range. The number of your orders must be less than or equal to the maximum value.
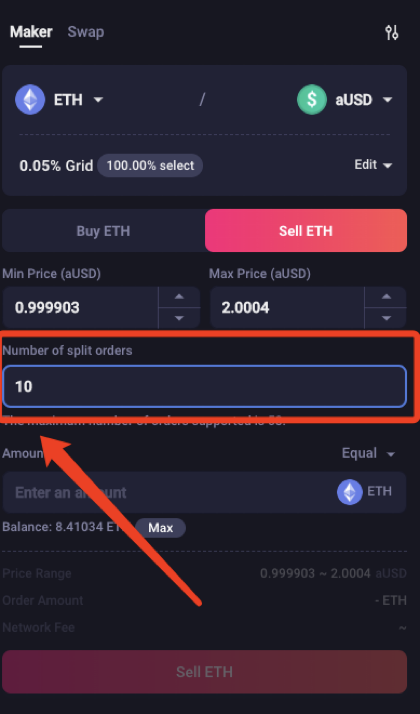
Enter the amount
Confirm the order information and place the order
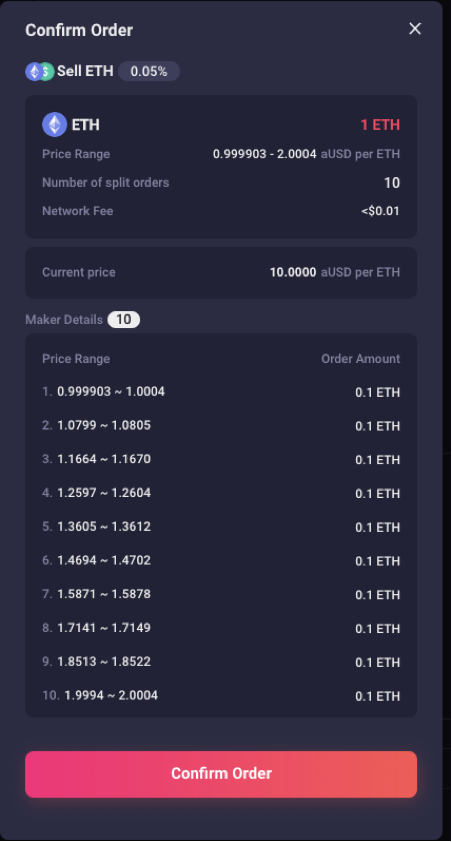
After an order has been placed successfully, you can check the status of the order in the Open Order tab
3.4 How do I check my transaction history?
On the "Trade" page, you can view all of the information related to trading activities(in the lower right corner). In this area, you can switch between tabs to view your open orders, order history, and swap history.
On the [Open Orders] page, you can view the orders that are currently in progress, including unfilled/partially filled/filled but unsettled orders.

On the [Order History] page, you can view all settled/cancelled orders.

On the [Swap History] page, you can view all successful swaps.

On the [Orders] page, you can view all information related to transaction activity. In this area, you can switch between tabs to view your open orders, order history, and swap history.
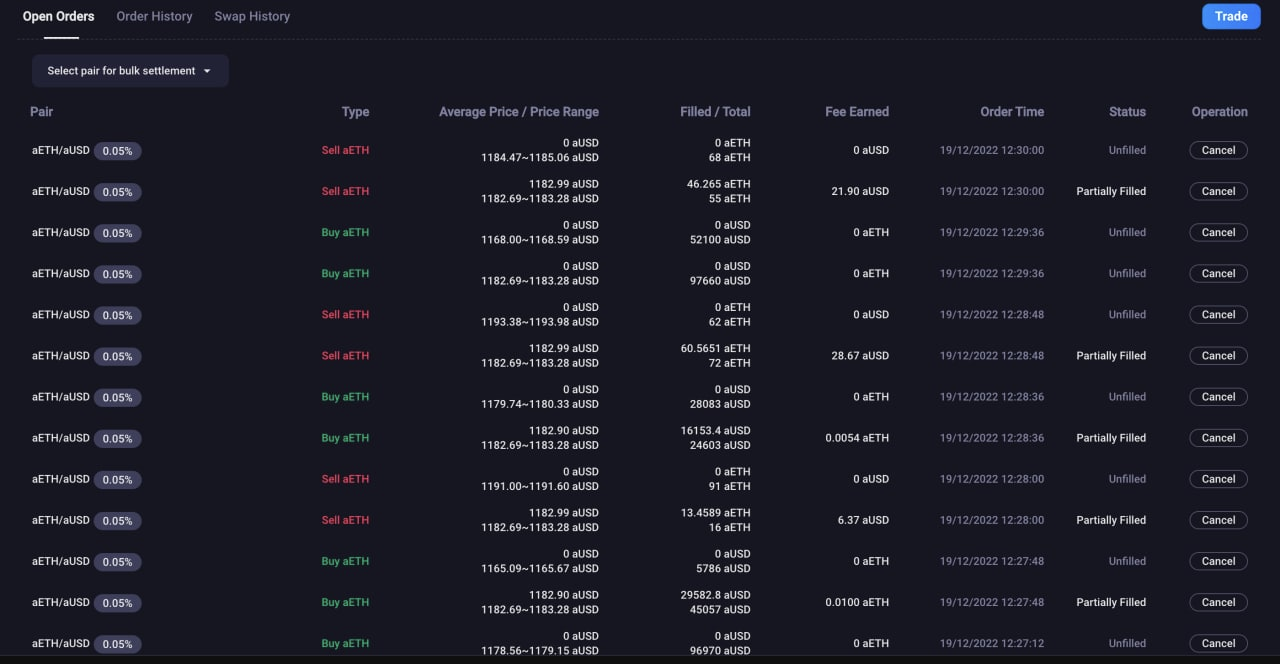
When selecting [Open Orders], you can perform bulk settlement/cancellation operations by filtering trading pairs.
4. FAQ
4.1 What is a wallet?
A crypto wallet allows you to store, send, and receive cryptocurrency on the blockchain. Your wallet is a combination of a public and a private cryptographic key that are used together to access your cryptocurrency.
Each crypto wallet also has a wallet address. Your wallet address is used to send and receive cryptocurrency. This means that you can safely share your wallet address with others.
Depending on the type of crypto wallet you have, your access to your private keys and recovery phrase will vary.
4.2 How do I get a wallet?
Custodial Wallet
A custodial wallet (centralized wallet) is a wallet that holds your private key and stores it securely with a third party. In most regulatory cases the custodial wallet's provider is a regulated entity like a bank, and the custodial wallet provider is primarily responsible for protecting your funds and account security. Therefore, when using a custodial wallet, you need to log in with a username and password to access your account with the provider, and the provider conducts transactions on your behalf.
Get a Custodial Wallet:
- Download the wallet app to your phone or visit your web browser directly to start setting up your account, etc.
- Create a username and password to protect your account. The wallet you choose will have specific setup steps for you to follow. It is important to know that you will not have access to your account\'s private key, as the wallet issuer will have custody of it.
Common Custodial Wallet include: Coinbase,Gemini
Non-Custodial Wallet
A non-custodial wallet (decentralized wallet) is software in which you alone hold your cryptographic private keys and are responsible for storing them securely, and a non-custodial wallet can interact directly with the blockchain or a blockchain-based application such as Gridex. When you are setting up a non-custodial wallet, there is no software provider account, so you must write down the recovery phrase (e.g., mnemonic) that you provided when you registered the wallet. Because no third-party provider can give you access to the wallet if you forget your private key or recovery phrase.
Get a non-custodial wallet:
- Download the wallet app to your phone or visit your web browser directly to start setting up your account, etc.
- Create an account and write down your recovery phrase (mnemonic), some wallets may prompt you to back up your recovery phrase to your phone. Always remember that anyone who has access to your recovery phrase can access your wallet. Do not share your recovery phrase with others.
- Connect your fiat sources to your wallet. Depending on the wallet, you can convert the fiat in your wallet to cryptocurrency with different options.
Common non-custodial wallet include: Metamask, Rainbow Wallet, Coinbase Wallet
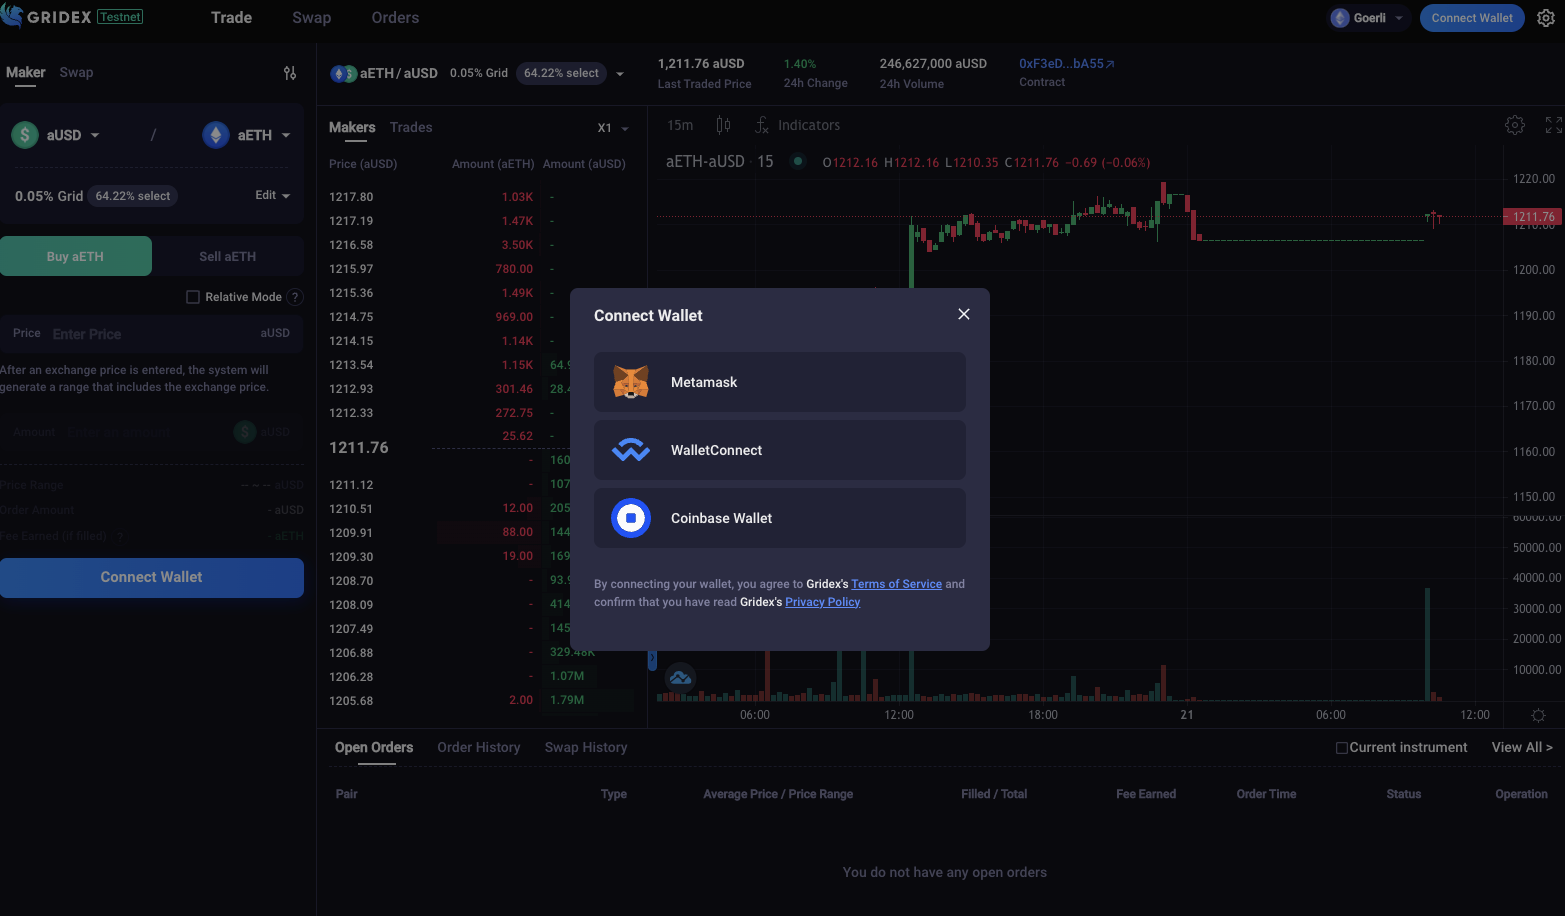
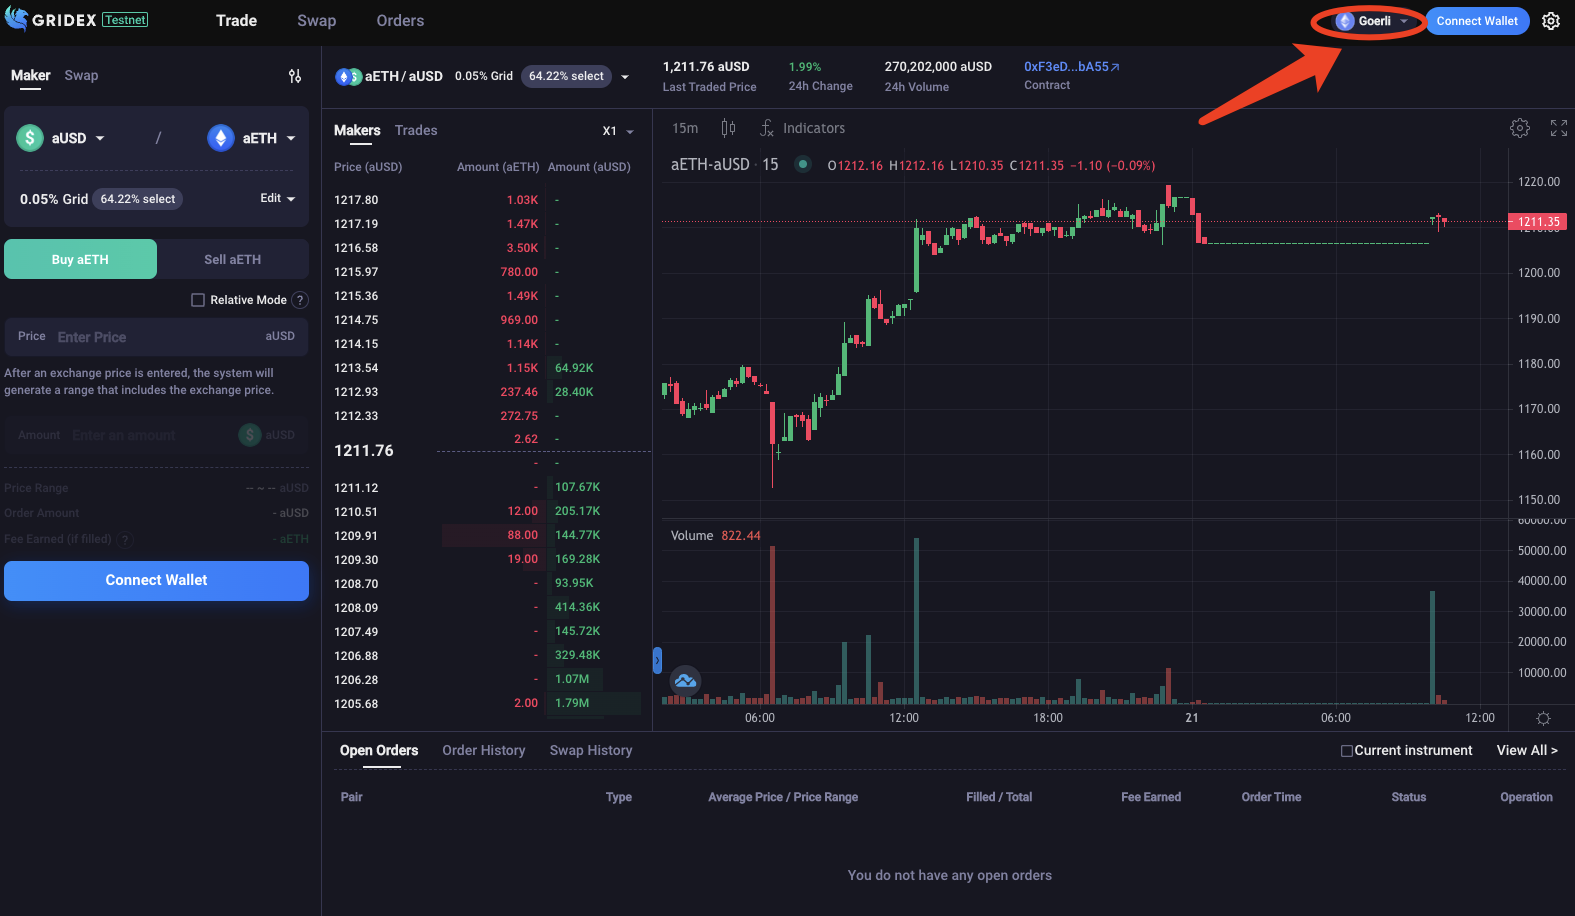
4.3 How do I connect a wallet to Gridex?
You are able to connect your wallet from Gridex directly in a few easy steps:
- Select the Connect Wallet button on the top right corner. Select a wallet to connect.
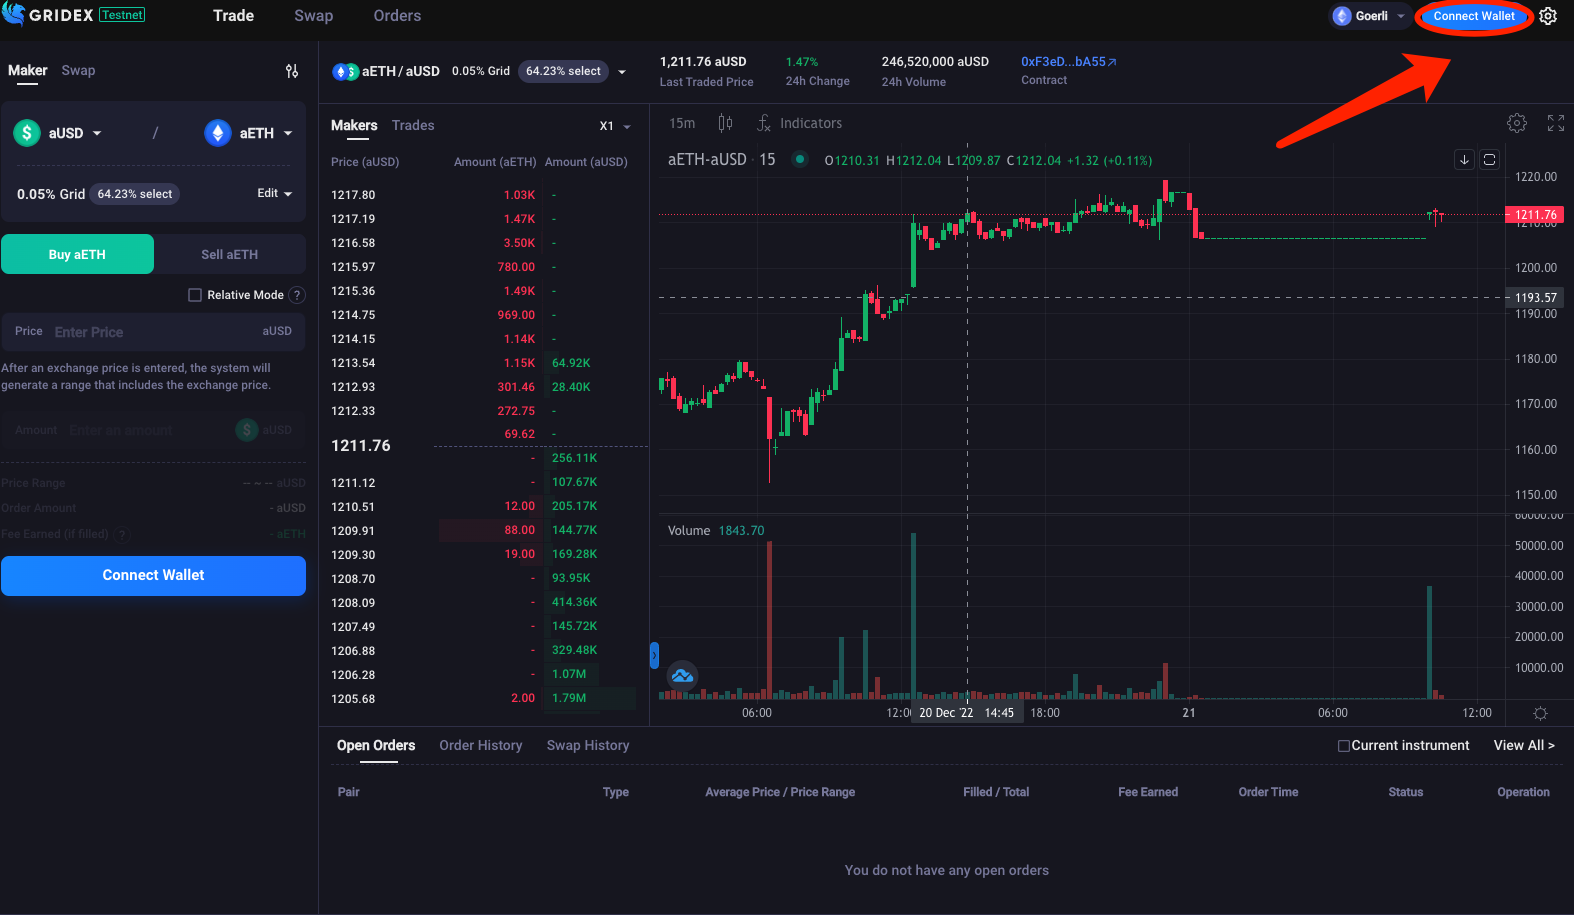
- If your wallet is not listed, select Wallet Connect to choose from the list of supported wallets.
4.4 What is a network?
What is a network?
A network is an environment. This is where users test, develop, and interact with others.
There are different networks available. The most common are the Ethereum Mainnet, the Ethereum Testnet, and Layer 2 networks.
The Ethereum Mainnet is the base blockchain where on-chain transactions occur. When you send ETH to a friend\'s wallet on the Ethereum network, you\'re using the Mainnet. This is also referred to as Layer 1 or the execution layer.
Layer 2 networks are where off-chain transactions occur. As the name suggests, Layer 2 networks operate on top of Layer 1. These networks reduce the cost, and time, of transactions. Optimism, and Arbitrum are examples of Layer 2 Networks.
Which networks do we support?
Currently Gridex supports ETH Network. We will support Polygon, Optimism, Arbitrum and more other networks in the future.
How to switch networks?
Select the network you would like to use in the top right corner.
4.5 What is a network fee?
A network fee is the fee paid to the miners of the network you are using for your cryptocurrency transaction. This fee is also known as a gas fee.
Every transaction on the blockchain requires a network fee. This is because miners use their own computers to verify and process transactions instead of relying on a central authority.
In return, miners are compensated through network fees. Network fees also incentivize miners to protect the network from malicious users.
These fees are non-refundable, even if your transaction fails. Miners still have to use their resources to determine that your transaction failed.
The Ethereum blockchain pays miners in Ether (ETH, measured in gwei) for network fees. But on the Polygon network, the network fees are paid in MATIC.
The network fee you pay will vary according to the network you use.
Gridex does not charge network fees.
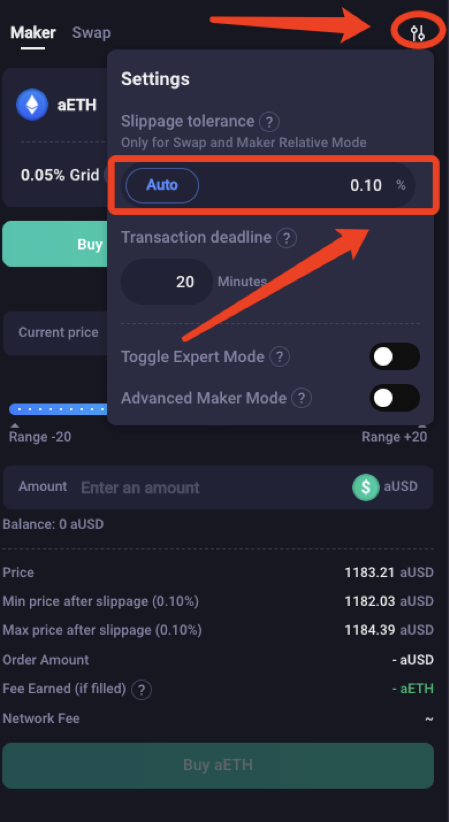
4.6 What is price slippage?
What is price slippage?
Price slippage is the change in token price caused by the total movement of the market. price slippage is reflected as the difference between the price you expect to receive after swapping vs what you actually receive after the swap is complete.
The minimum amount you receive from a trade is determined by the market price and your slippage limit setting. The slippage tolerance is adjustable. The Gridex sets a default slippage tolerance of 1.00%.
How do I set a price slippage tolerance?
Select this button on the Trade page and enter slippage tolerance.
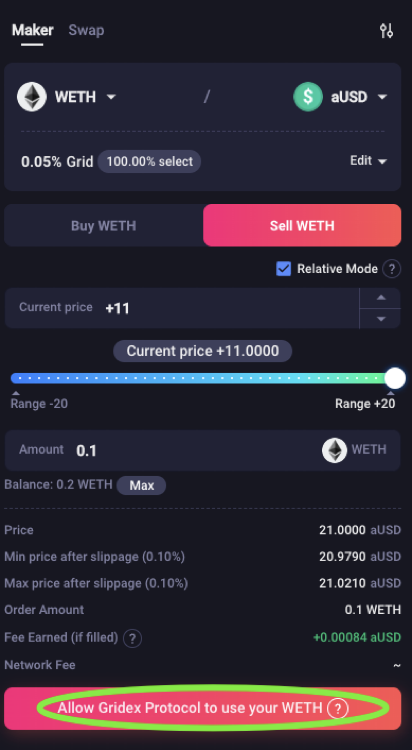
4.7 What is an approval transaction?
The first time you swap or become a maker, you will have to approve the token. This gives the Gridex Protocol permission to swap that token from your wallet.
Once you approve a token, you will not have to approve that token again on Gridex. Each token from a specific wallet address you wish to trade requires a one-time approval.
When you are ready to swap tokens or place an order, you will see the following prompt:
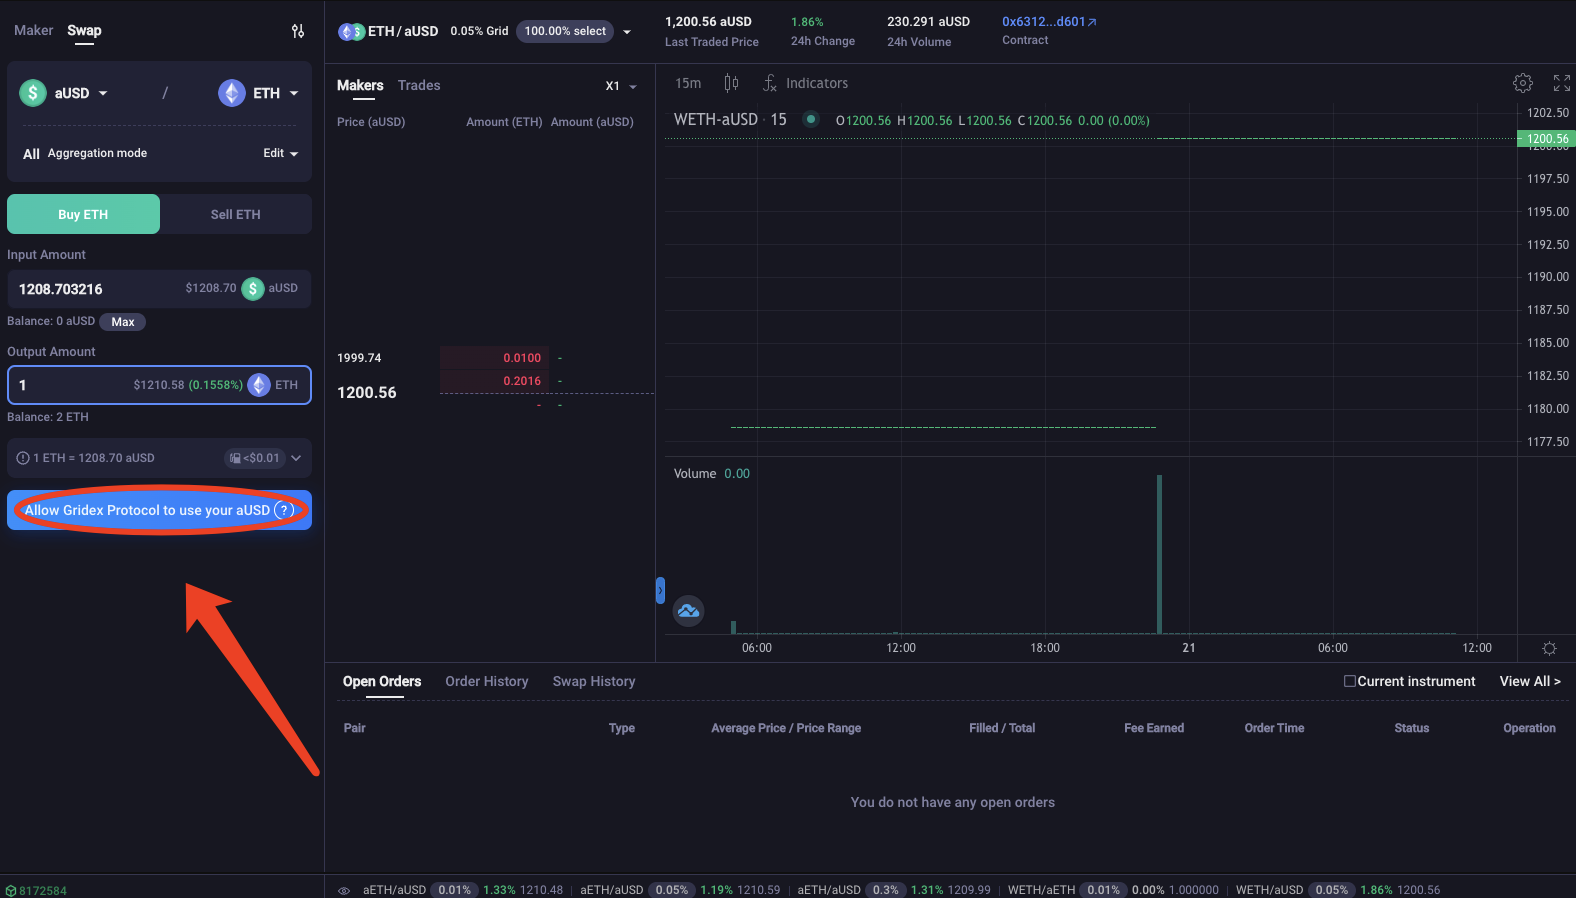
When you approve a token, it is considered a transaction so you will have to pay a network fee.
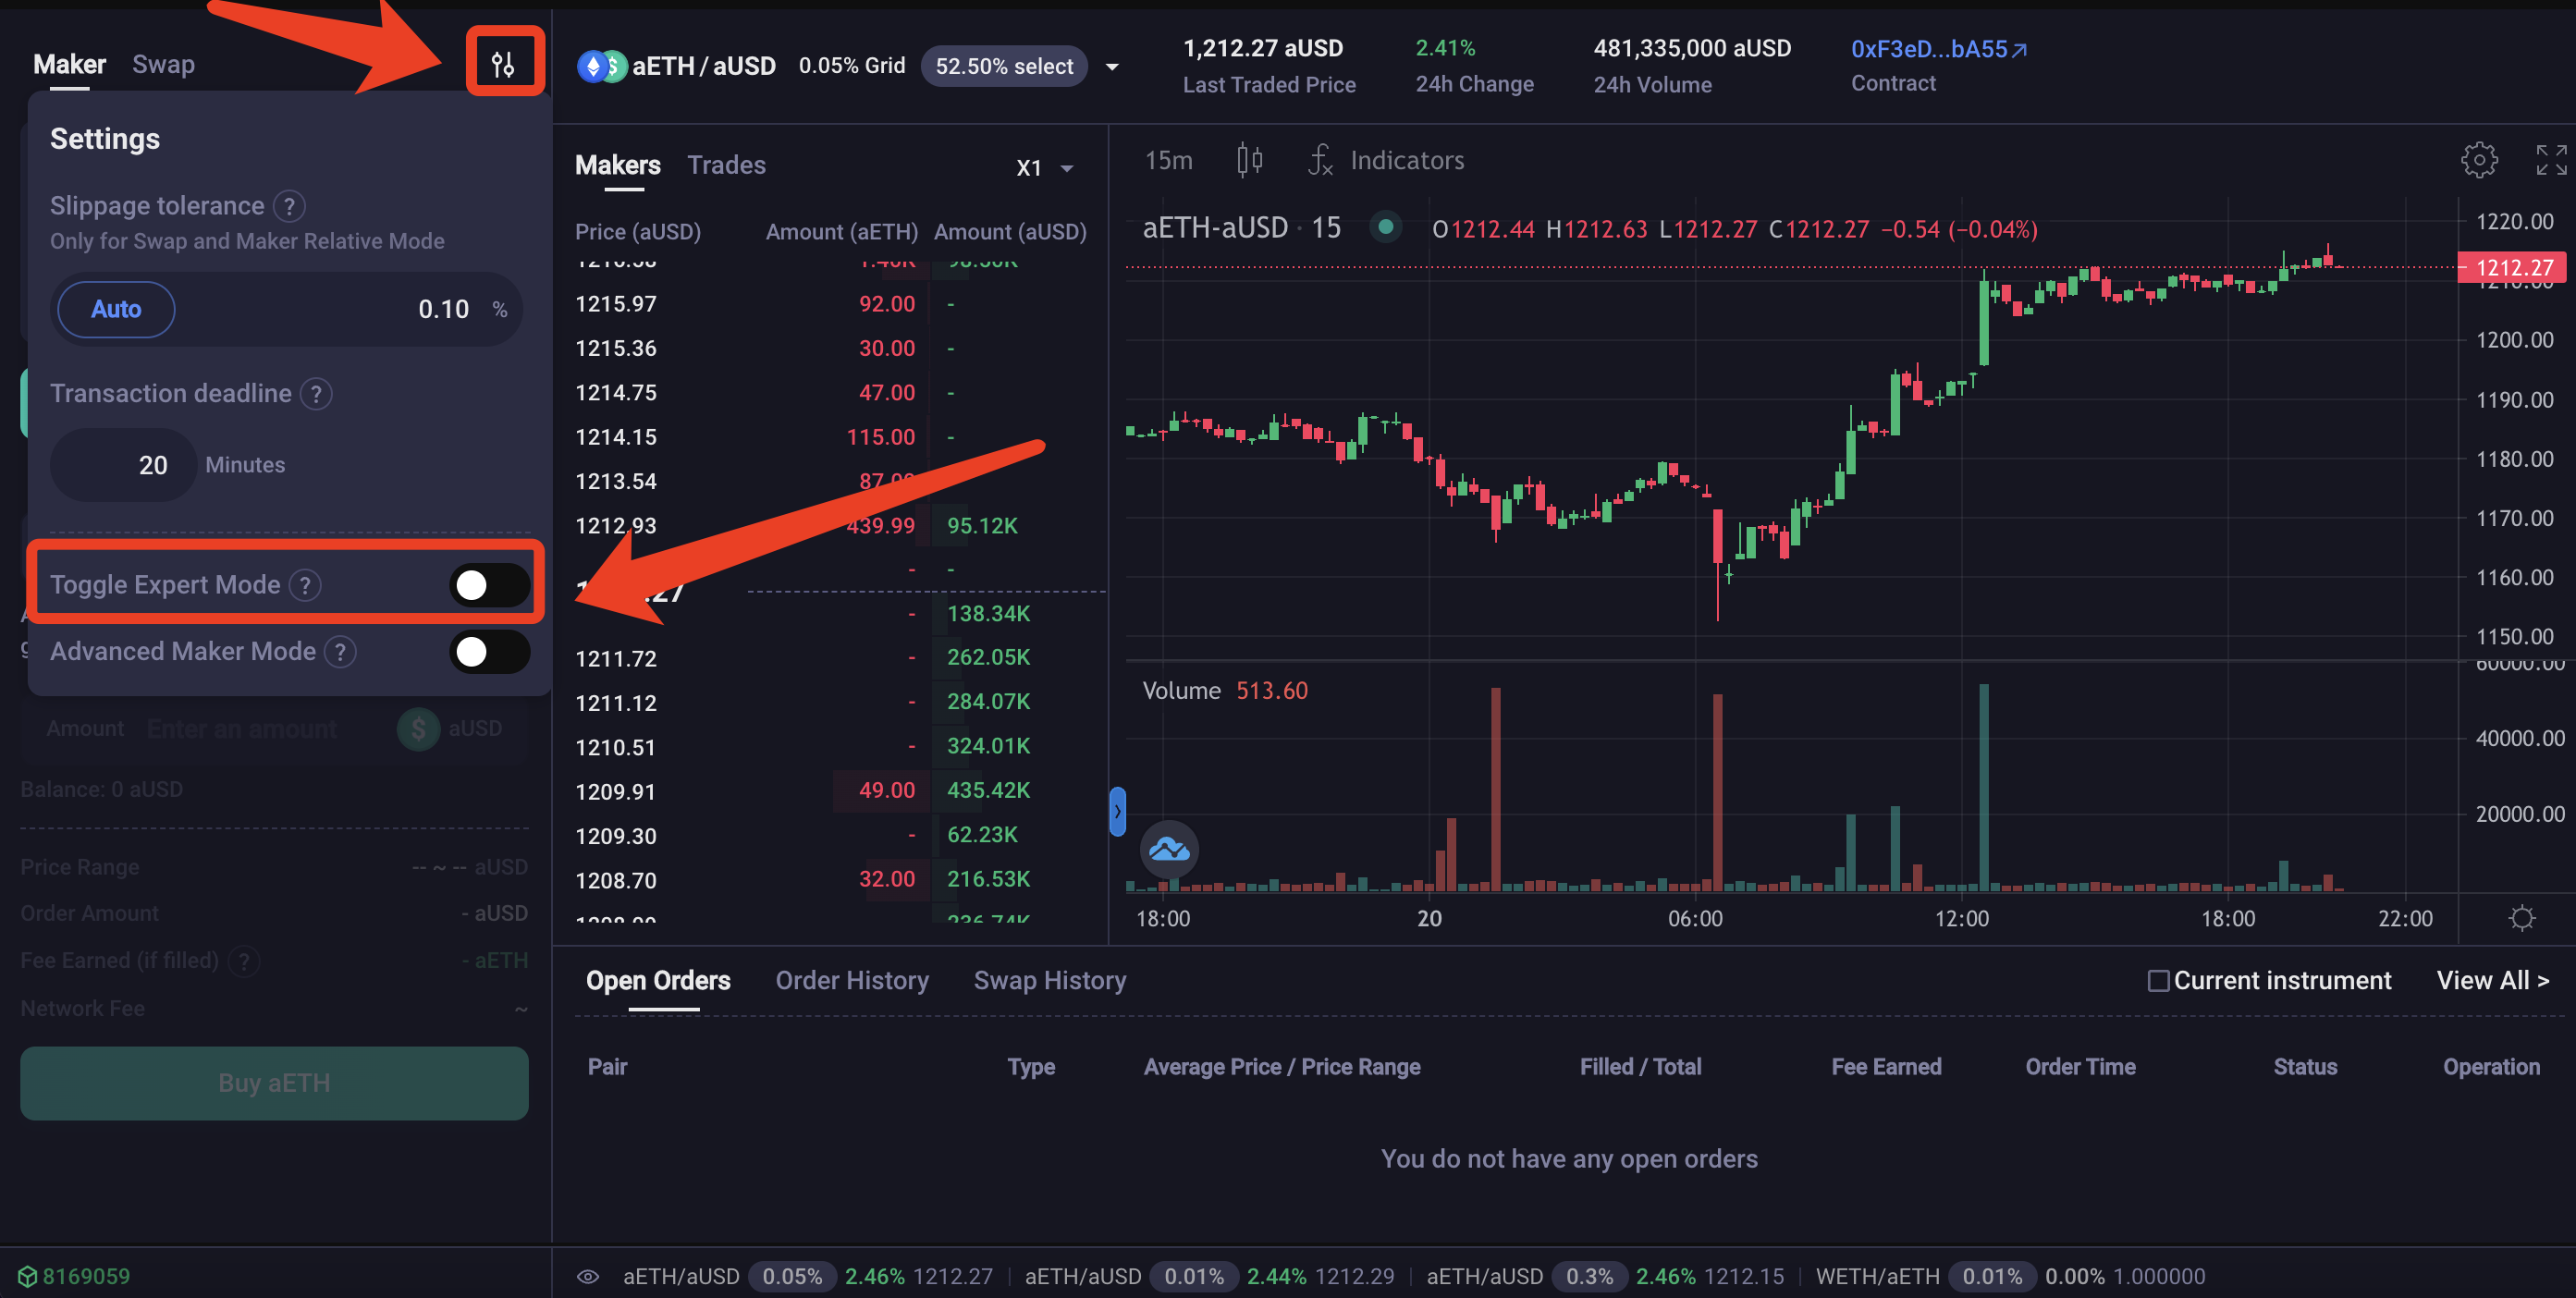
4.8 How do I use Expert Mode?
What is Expert Mode?
Expert Mode allows experienced users to make high slippage trades.
High slippage trades can often result in a lower rate of exchange when swapping tokens, resulting in a lower return. Experienced traders may use Expert Mode because they believe they can turn a high rate of return from a trade, despite the losses they may experience.
After opening Expert Mode, all confirmation pop-ups in maker and swap mode disappear, saving trading time for professionals and improving trading efficiency.
How do I use Expert Mode?
- In the Trade page select the setting icon on the top right corner, then select to enable Expert Mode.
- A warning sign will appear - select \"Turn on expert mode\".
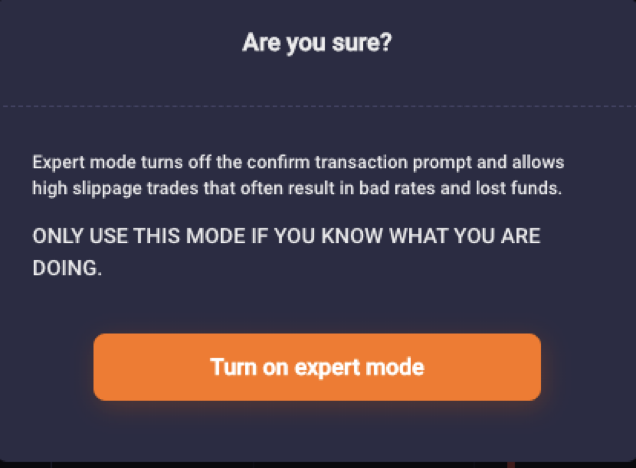
- A popup will appear asking you to manually type "confirm".

5. Developer
5.1 Third-party APIs
Gridex uses the following third-party APIs
- Auto Router
Fetches the most optimal trade routes from a Gridex server.
- Infura
Fetches on-chain data and constructs contract calls through an Infura API.
- The Graph
Fetches blockchain data from The Graph's hosted service.